

Letters that look finished on a mood board can stall a hull close-out if the yard never received a real integration pack. What information your yacht builder needs for signage integration is not a styling question first. It is a systems brief: identity, hull geometry, electrical paths, and legal marks in one file before anyone drills gelcoat. Whether you are freezing a new-build specification, sequencing a yacht refit, or writing a naval architect specification, this checklist is the handover you send a shipyard sign supplier so 316L letters arrive as hardware—not as a last-week surprise.
Treat Signage as a Systems Line, Not a Last-Week Sticker
On a new build, name letters sit at the intersection of exterior styling, electrical, composites, and flag-state marking. If the owner picks a font in week fifty-two, the transom may already be closed, lockers lined, and cable paths painted shut.
- Exterior: letter height, finish, and glow have to agree with hull color, hardware, and night approach photos.
- Structure: stud maps need core locations, solid laminate, and interior nut access—not a guess through gelcoat.
- Electrical: 12V or 24V, fuse rating, cable gauge, and a dry controller location belong in the same drawing package as other DC loads.
- Compliance: name and hailing port still have to read in daylight. Illumination does not replace contrast or legal height.
Start the conversation the way you would any other fitted system. Share project basics through how it works, then treat the letters as a specified custom yacht sign with a drawing freeze—not a décor add-on after sea trial.
Identity, Artwork, and Legal Marks
The yard cannot size a transom until the wordmark is frozen. Send artwork that a fabricator can cut, not a screenshot from a brochure PDF.
- Exact name string: spelling, spacing, punctuation, and whether a house flag or crest sits in the line. If a crest is part of the marque, brief it with custom logos, crests, and emblems.
- Vector artwork: AI, EPS, or SVG of the approved typeface. Outline fonts. Do not send a phone photo of a sketch as the master.
- Font family: script versus sans is a vessel-identity decision. Settle it early with script vs sans-serif guidance so transom, quarters, and flybridge share one voice.
- Legal hierarchy: documented recreational vessels typically need the name and hailing port marked together on a clearly visible hull plane—usually the transom. Superstructure letters do not satisfy that duty. Confirm details in legal requirements for yacht names and ports of registry.
- Port of registry line: smaller than the name, still at or above the flag’s height floor, same finish family.
If the owner is still debating locations, freeze the legal hull set first, then optional quarters or flybridge as a coordinated program—see yacht name placement on transom, quarters, and flybridge.
Hull Geometry, Substrate, and Mounting Data
Fabricators size letters to the quiet rectangle that remains after stairs, platforms, hatches, and hardware steal width—not to the full beam on a GA drawing. The builder owns the substrate data; the supplier owns the stud map.
- Straight-on and offset photos: transom (or quarters/flybridge) in daylight, with a tape or known object for scale. Shoot square to the plane, then from the dock and swim-platform edge.
- Overall dimensions: usable width and height of the mounting zone, plus notes on curvature, reverse transom, and any compound bend.
- Substrate map: solid laminate versus cored panel, aluminum plate, or teak overlay. Mark voids, tanks, and areas where through-bolts cannot land.
- Interior access: locker photos behind the stern so nuts, washers, and cable glands can be reached after lining. No access means a different fastener strategy.
- Interference list: swim-platform hinges, camera housings, passerelle pockets, washdown fittings, and fender zones that will scuff quarter letters.
Dry-fit before drill. The yard workflow in yacht sign fitting and the mechanical path in installation should sit in the same package as the letter drawings. For illuminated sets, keep installing a backlit yacht sign safely on the bench when the fitter opens the lockers.
Electrical Integration: Voltage, Cable Paths, and Control
Halo letters are a small DC load and a large commissioning risk if voltage, polarity, and penetrations are improvised after paint. Ask the shipyard electrician for the same facts you would collect for underwater lights.
- System voltage: 12V or 24V as-built—not “whatever the tender uses.” Mismatch is a common late change order. Align early with 12V vs 24V LED systems on luxury vessels.
- Dedicated fused circuit: lettering should not share a random house-lighting breaker. Note fuse rating, cable gauge, and run length to the furthest letter so voltage drop is designed, not discovered at night.
- Cable path: from transom locker (or brow void) to a dry, serviceable controller location. Photograph the intended route while panels are open.
- Penetrations: gland size, sealant spec, and whether the hull or superstructure is already closed. Late holes through finished gelcoat cost more than planning them in the plug.
- Control intent: simple switch, dimmer, or programmable color. Compare RGBW vs single-color LED against deck and underwater lighting so the name does not ship a different white.
- Ingress rating: washdowns and spray demand potted modules and sealed harnesses—see IP67 vs IP68 guidance.
If budget allows only one illuminated plane, light the legal hull name first. A glowing flybridge with a dark transom reads as unfinished. Product options live under illuminated yacht signage and single-color LED packages.
Finish, Lighting, and Material Spec
Write alloy, face finish, and glow as a single specification line so polish routines and night photos stay one system across locations.
| Spec item | What to send the builder | Why it matters |
|---|---|---|
| Alloy | 316L marine-grade stainless (not 304) | Salt, washdowns, and tea staining punish the wrong grade |
| Face finish | Mirror or brushed; same family on all planes | Mixed finishes look like two suppliers met on the transom |
| Letter depth | Target depth and stand-off from the hull | Halo quality and shadow lines depend on gap, not only height |
| Glow | Single-color Kelvin or RGBW; brightness intent | Must match deck lighting and marina photography |
| Diffusion | Backlit / halo preference and hot-spot tolerance | Uneven glow reads as a cheap retrofit on a new hull |
| Maintenance | Rinse/polish routine the crew will actually keep | Mirror drama vs brushed forgiveness is an operations choice |
Anchor the metal decision with 316L stainless steel and mirror stainless or brushed programs. Glow examples live under lighting options. Aesthetics should still match the vessel story in matching yacht signs to boat aesthetics.
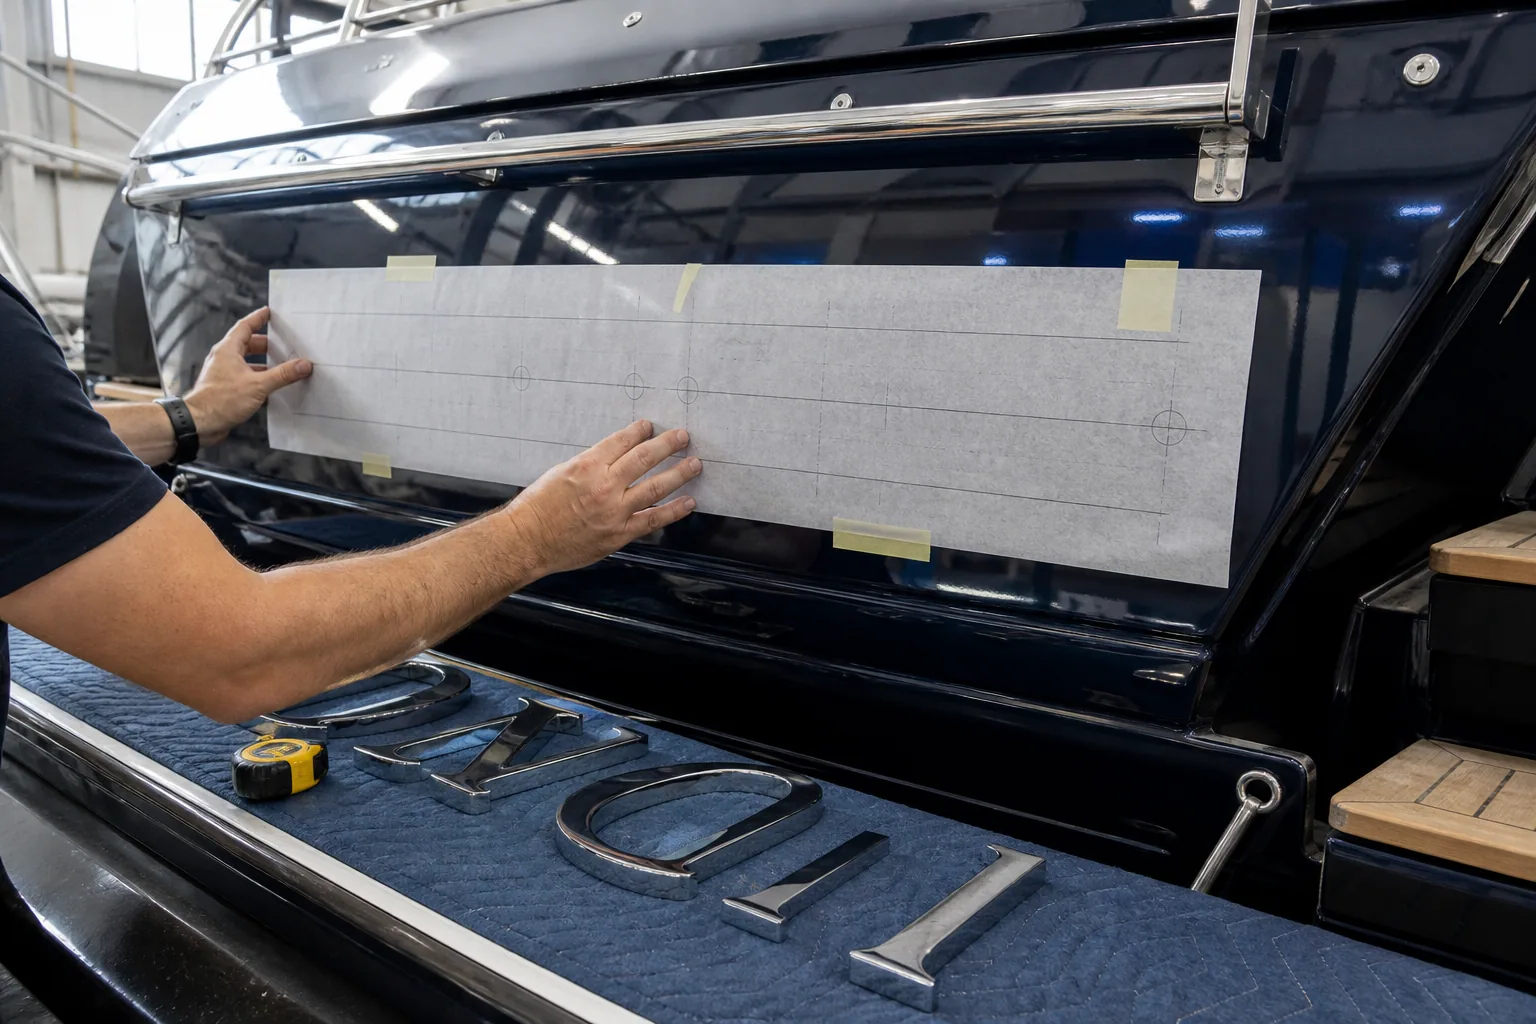
Fit the template on the real plane before the stud map is frozen. Yacht Sign Fitting.
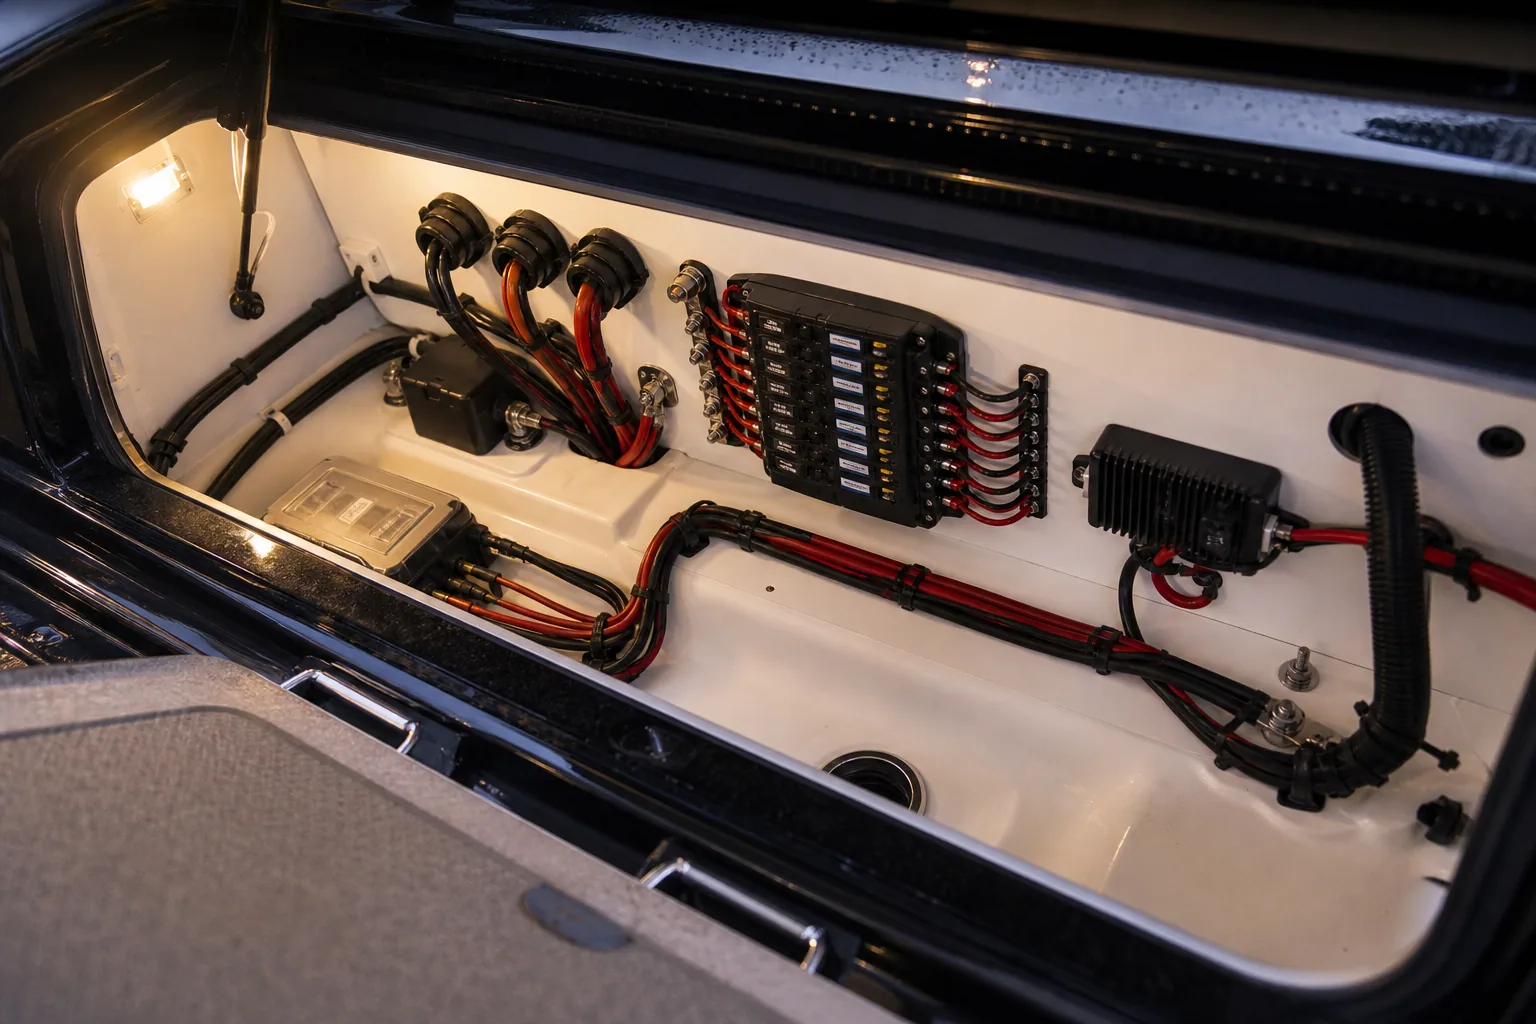
Electrical paths belong in the same brief as the letter drawings. Installation.
When to Freeze the Brief in a New Build or Refit
The cleanest programs freeze artwork and voltage before the transom is closed, then install after fairing or paint cure—not on green primer. Use this timing map when the project manager asks “when do we need the letters?”
| Phase | Owner / captain | Yacht builder / NA | Sign supplier |
|---|---|---|---|
| Concept / GA | Name, crest intent, locations | Reserve mounting zones on drawings | Rough size ranges from hull photos |
| Systems freeze | Approve font, finish, glow | Voltage, cable path, core map | Layout proof and stud-map draft |
| Before hull close-out | Sign drawing approval | Pull cable, glands, locker access | Final dimensions from finished plane |
| Paint / fairing cure | Confirm legal hierarchy | Protect mounting zone | Produce 316L letters |
| Install / commission | Day and night photo sign-off | Seal, torque, electrical test | Install support and spare seals |
Refit calendars punish late lettering the same way new builds do. Sequence fabrication against the yard window with refit yard timing for custom lettering so the name is not the silent critical path.
Have hull photos and a voltage note ready? Send the integration pack and we will return a layout proof.
The Signage Integration Pack Your Yacht Builder Should Receive
If you send only one document, make it a single PDF the project manager, electrician, and fabricator can all mark up. Include:
- Cover: vessel name, builder, hull number, contact for the captain and the electrical lead.
- Artwork: outlined vectors, legal name + port stack, optional crest as a separate layer.
- Locations: transom primary; quarters and flybridge only if scoped, with height ratios.
- Photos: mounting plane, interior access, and any existing holes or vinyl ghosts on a refit.
- Electrical: 12V/24V, fuse, cable path sketch, controller location.
- Materials: 316L, mirror or brushed, glow spec, IP expectation.
- Schedule: drawing-approval date, production buffer, install window, sea-trial photo set.
That pack is enough for a backlit yacht sign quote that matches the hull instead of a generic letter height from a catalog. Done well, yacht builder signage integration disappears into the build: no emergency holes through finished gelcoat, no voltage surprise at night, and a name that reads as architecture when the harbor first sees the transom.
FAQ
What information does a yacht builder need for signage integration?
Send a single pack: exact name and port artwork in vector form, hull photos with scale, mounting-zone dimensions, substrate and interior-access notes, 12V or 24V electrical details, finish and glow spec, and the legal marking hierarchy. The builder adds core maps and cable paths; the supplier returns a layout proof and stud map. Incomplete photos or a missing voltage note are the usual reasons letters miss a hull close-out.
When should signage be specified during a new yacht build?
Reserve the mounting zone on the GA, freeze font, finish, and voltage at systems freeze, and approve drawings before the transom is closed so cable and glands go in with other DC work. Produce letters after fairing or paint cure, then install and commission with day finish photos and night halo photos. Waiting until sea trial usually means drilling a finished surface or skipping illumination.
Are hull photos enough, or does the yard need CAD files?
Straight-on and offset photos with a scale reference are enough to start a layout proof for most production yachts. CAD or a dimensioned transom drawing helps when curvature is severe, the mounting plane is small, or multiple locations must share one type family. Never use a brochure rendering as the measurement source—size to the quiet rectangle on the real hull, after hardware and platforms are known.
What electrical details should the shipyard include in the brief?
State as-built DC voltage, a dedicated fused circuit, cable gauge and run length to the furthest letter, the intended controller location, and how penetrations will be gland-sealed. Photograph the locker path while panels are open. Do not daisy-chain a flybridge run off a transom harness as an afterthought—each illuminated set needs its own fused path.
Who should own the signage integration checklist—owner, captain, or naval architect?
The naval architect or project manager should own the drawing freeze and substrate data; the captain or owner freezes identity and legal hierarchy; the electrician owns voltage and cable routing. One person—usually the PM—assembles the PDF so the shipyard sign supplier is not reconciling three conflicting emails. Split ownership without a single pack is how fonts change after metal is already cut.


